Showing posts with label citrus. Show all posts

Thursday, January 20, 2011

It's Bare-Root Time

Note, I'm not actually planting any bare root trees this year, but i COULD be and so could you. Here are some tips i wrote over at Yard Farm Austin (which is a nifty website and niftier business bringing farms to urban yards all over Austin).
Lemons harvested.
My harvest last year - nice yield, but look how much smaller the tree was! They grow fast if given the room.

Poorly lit, badly composed photo of my Meyer currently. I've already harvested 3 lemons, averaging 8 oz..
Looking to add some citrus trees, stone fruits, or nuts to your garden? It's time to plant bare-root trees, an affordable option for starting your orchard. You can order bare root trees from catalogs and on line, and can find them at The Natural Gardener, The Great Outdoors, and many other local nurseries here in town. The Natural Gardener prides themselves in only picking varieties that are well suited to our climate, so you can make a good bet with any stock you purchase there. If buying somewhere else, feel free to ask the sales people plenty of questions and know just how cold (or hot) the variety can take and if it requires protection during the Winter months. When buying from a plant nursery, be sure the bare root has been sitting in a moist area, often wrapped and sometimes setting in a large tub of sand. Be sure and keep your bare root tree moist until the time of planting and if the bare root stock you purchased hasn't already been cut back to a sad looking whip, do it at planting time.

Winter is the best time to plant trees and perennials because they have a chance to establish some roots before the brutality of Summer hits. Bare root are only available in Winter because they are dormant and can withstand being moved about without any soil.  Bare-roots are the least expensive option when choosing a fruit tree and are easy to plant, just keep those roots moist! Planting bare-roots and other trees are all done in the same method:
  • Dig a big hole, bigger than needed.
  • Mix in some compost and bone meal to the soil removed from the hole and backfill the amended soil into the hole.
  • Mound the soil so that the tree will be level in the ground to the pre-existing soil line on its trunk.
  • Spread out the roots in the hole over the soil mound and fill with just enough soil to cover the roots.
  • Water WELL. Really soak those roots, filling the entire rest of the hole with water. You may include seaweed or a liquid fertilizer to this water.
  • Once the water has soaked in, fill the hole with the remaining soil.
  • Add a stake for support and leave the soil line of the hole slightly lower than the surrounding ground to encourage water to accumulate around the tree.
  • Mulch and water 3 times a week with at least 3 gallons at a time. Water is the number one variable in the success of your tree's life. You can also add organic fertilizer or seaweed, but keep that tree moist and happy for the first year!

It can also be helpful to add a B-1 hormone root stimulator when watering the first 3 or so times in order to get your new tree's roots up and running.And remember, if you want to save money and buy bare-root, you have to do it before the Spring begins the thaw (not that it's actually been cold at all this year, other than today). The stock will begin coming out of dormancy if held bare-root too late, so you have to get 'em while they're cool!

The tree gets no respect
Are you planting any nuts or fruit this year? Will you get yours at a local nursery or order from a catalog?
This post is part of the Simple Lives Thursday blog hop.

Monday, October 4, 2010

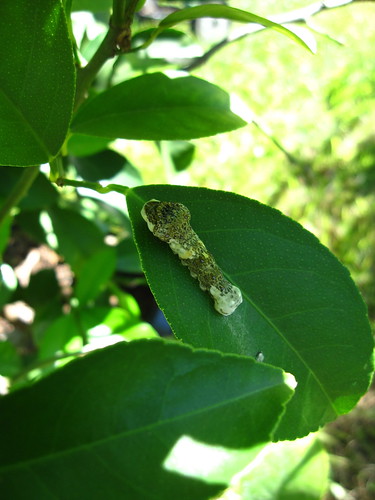
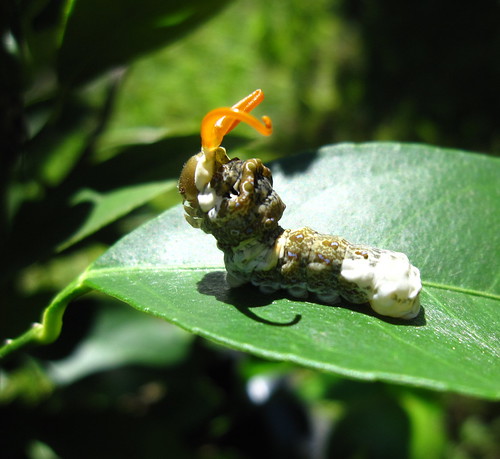
Garden Critter Spotlight: Giant Swallowtail Butterfly - Orange Dog Caterpillar

I love my lemon tree to pieces. Which means this lovely caterpillar is about the only one i allowed to live, picking off the rest of his brethren. The Orange Dog Caterpillar mimics bird poo to avoid being eaten by predators (as is proven by the hens' total disinterest in eating the picked off bugs we offered to them), and is a pretty good trick on human eyes, too! The caterpillars start out quite small and get larger, able to chow down pretty heavily on citrus leaves. On larger trees, they wouldn't be much of a problem and worth leaving alone to enjoy the beautiful Giant Swallotail Butterflies. But my little tree is just now leafing back out in the cooler days and i'm not about to let those new, tasty leaves be gobbled up by caterpillars, no matter how pretty their mature phase is. The more leaves on a lemon, the more fruits, and with the Grackle birds pecking at all my ripening lemons i need all the foliage i can get!

That being said, i allowed this guy to stick around since he was already pretty large. I picked off several other from my little kaffir lime trees as they're SUPER small and one caterpillar can defoliate them in a jiffy - and did.

Is that bird poo on my lemon tree? Nope, it's a caterpillar, and check out those horns when provoked!

What's Growin' End of September 2010

Part of gardening is managing 'pests' and all the critters in your landscape. Do you let them run amuck and manage themselves? Do you step in and remove certain, less ideal bugs? I try and leave most things alone. The anoles will eat the baby leaf footed bugs, but not quickly enough so i spray them down with soapy/spicy/garlicy water when i can find them.  The toads, geckos, skinks and other crawlies do a pretty good job of managing most the other bugs and the birds get the majority of the hornworms and other caterpillars. If i had more than one lemon tree, i'd let all these funny looking caterpillars have their way with the foliage and mature into beautiful butterflies.
But i've only got my one lovely, and i'm not afraid to defend her!

Wednesday, December 30, 2009

Herbed Oil and Vinegar

Ah, Christmas. Sometimes my favorite time of year. At the very least it's a great time to find excuses to craft, bake, and create things you might otherwise not find time to do. This post is tardy as i obviously didn't want to spoil any surprises!

Herbed oils and vinegars are easy to do, and especially special when they're made entirely with homegrown herbs and veggies.  This year I'm giving each set of parents (i have three) their own oil and vinegar sets. I have to ship the ones to my Dads and Moms in Oregon, so i am rigorously crossing my fingers that they don't explode on the way there.
Flavors and herb choices are entirely up to you or up to what your garden is providing. If it was summer i would have put in a lot more fresh basil, and if my lemon thyme plant hadn't died in this summer's drought i would have been able to put a lot more of that in there: same goes for my lemongrass. You simply want to choose "a theme" and try to stick to it. I put together what i had on hand:

Herbed Oil - Italian Herbs with Garlic

  • Extra Virgin Olive Oil
  • fresh and roasted garlic - mashed + whole for garnish
  • fresh rosemary and sage - diced + whole sprigs for garnish
  • fresh oregano - diced
  • peppercorns and dried hot peppers for garnish
Flavored oils are so easy: Simply dice up all the herbs and garlic and put in a mortar and pestle with a drizzle of oil. Mash until you can't stand it then scoop it all into a mixing bowl. Pour the rest of your oil into the bowl and mix well - be sure to get all the goodness off the pestle.  Once well mixed pour the oil mixture into some well sealed jars and be sure to shake them up daily. Marinate the mixture for at least 2 weeks. (i had to skimp the Rommels due to time i'm afraid, theirs only got marinated for about a week, sorry!) When you are ready to bottle simply stuff the fresh herbs and peppercorns/garlic into some pretty bottles: feel free to recycle old oil bottles for this. Using a strainer and funnel one over the other carefully pour the oil into your bottles. The strainer will catch the gook and the funnel will direct the oil into the bottle instead of all over your counter. Be sure to leave some room on the top.
Try and store the oil in a dark, coolish place. The fresh herbs contribute to ease of going rancid so you want to use this oil within 6 months and keep it from getting too warm and friendly to bacteria.

Herbed Vinegar with Citrus

  • White Wine Vinegar
  • Fresh Meyer Lemon Zest for marinating and garnish
  • Garlic - diced + whole for garnish
  • Fresh Dill - diced + whole sprig for garnish
  • Fresh Parsley - diced + whole for garnish
  • Garlic Chives - diced
  • Lemon Thyme - diced
  • Peppercorns and Dried Hot Pepper for garnish
  • (wanted to include fresh lemongrass, but it died in the first frost)
Pour vinegar into a non reactive pot and heat to just boiling. Meanwhile dice all the herbs and mash in a mortar and pestle. Place herbs in a mixing bowl and pour hot vinegar over them when it is ready. Cover and let cool. Once cooled off a bit pour the vinegar mixture into well sealable jars and store in a dark place, shaking daily, for at least 2 weeks.  When you're ready repeat the same process as with the oils and pour through a sieve and funnel into pretty bottles - i reused the original vinegar bottles.

Presentation:

Is totally up to you, of course. But i wanted these to look pretty and special and "me." I scraped off the original labels with a flat exacto blade, any sticky residue can be removed with WD40. If i had had labels, i may have stuck something to the side of the bottles, but since i didn't i used black hemp twine and recycled Artagain Paper (the same that i use with my illustrations). I hand wrote (redoing several times as my handwriting is NOT good) the ingredients and suggested uses and storage instructions on the paper and strung it to the bottles with the twine. I think the black hemp looks nice on the naked bottles filled with pretty and scrumptios stuff.