Showing posts with label garlic. Show all posts

Wednesday, May 25, 2011

Wholesome Wednesdays: Garlic

It's garlic time! This year's softnecks are braided and hanging in the kitchen, some hardnecks that weren't quite ready are bundled and drying despite being immature, and a few more hardnecks and elephant garlics are still out in the garden getting nice and big. It's a good time of year to repost last year's Wholesome Wednesdays: Garlic. Enjoy!


Garlic, how do i love thee? I love thee very much! I've heard friends recently say "that recipe calls for 4 cloves of garlic, and that's just too much!" NEVER! NEVER TOO MUCH! I may be sweating garlic from my pores and panting from the mouth, but there's never too much garlic for me!

According to nutritiondata.com:
This food is very low in Saturated Fat, Cholesterol and Sodium. It is also a good source of Calcium, Phosphorus and Selenium, and a very good source of Vitamin C, Vitamin B6 and Manganese.
Caloriecount.com agrees and neither website can say ANYTHING bad about garlic at all:


Like onions, i put garlic in just about everything i cook. It adds flavor, spice, and when roasted a real decadent creamy element. I usually put at least 3 cloves garlic in everything. Vitamin C, Calcium, and Iron are all things my body needs a lot of, especially since i don't eat a lot of citrus, dairy, or red meat. I planted as much garlic as i could fit into my gardens this year, but am still disatisfied with the yield. So far i've only been able to harvest the whips, or immature garlic that you eat more like a scallion. But their leaves are browning and the bulbs are finally expanding a bit, so i think in about a month or so i'll be harvesting and setting out to cure and then braid for storage. Store garlic in a cool, dry place: which doesn't exist in my house. But i use it up so fast, it generally doesn't have time to rot. You can't store garlic in the ground like onions, it will rot if you're not diligent.
These are last year's garlic braids. Hard necks don't like to be braided. This year's are much prettier. I'll have to take some photos soon.

Some garlic growing/cooking facts:
  • Each green leaf you see above ground equals a 'paper' on the clove and eventually a bulb. Wait for the leaves to brown, but not completely or you risk rotting. Check below the soil a few times until you see a nice plump bulb, harvest one and assess the situation. you want the papers to be pretty developed to protect each clove.
  • Garlic gets meaner with more abuse: if you put garlic cloves through a garlic press or bash to a smoosh with a knife, the garlic will be spicier. For milder tasting garlic, only tap the clove to remove the paper, then dice carefully.
  • The greens are edible when the plant is young.
  • The scapes and flowers of garlic are very tasty, almost like oniony broccoli. Saute and enjoy!

Friday, October 1, 2010

Time to Plant Garlic in Austin

The moon is waning*. It's the first of October. Nights are cooling and days are shortening.
It's time to plant the garlic.

harvested garlic

I saved several bulbs from my summer harvest and plan on planting them on Sunday with some homemade bone meal. I'll put most in my back bed, along with the multiplying onions, but stick a few somewhere in the front as well since that bed is not looking promising, sunny, or consistently watered/tended by me.

You have most of the month to plant, but as we may be moving in the early summer i want to get them in as soon as possible and hope for a chance at harvesting them before we go.

Elephant Garlic
Little elephant garlic peeking out last fall.

*Moon phase gardening is something new to me, and i have no idea if it's valid or just hocus pocus. The idea is that you plant veggies that grow below ground (carrots, potatoes, radishes, garlic) when the moon is waning and plants that grow above (tomatoes, kale, most everything else) when the moon is waxing. It's not always easy to remember this or get the timing with the season and rainfall right. I have a handy dandy moon phase calendar on this blog that i refer to often. Check it out and try your hand at moon phase gardening. It's worth a shot!

Saturday, June 5, 2010

Garlic Scapes - A Look Back

Happy weekend, everyone.
Well, I may have harvested all of my garlic bulbs last week, but i didn't mention much of my earlier harvest of the unbloomed flower heads, or "scapes." Thanks to Susy at Chiot's Run for mentioning scapes to me on one of my flickr photos, as i was unaware of the name. What i WAS aware of was how delicious they were! I clipped the scapes in hopes to direct the attention of the garlic to its bulbs, not its tops - but i put the trimmed tops into a few dishes and wowee, so good! The flavor was more like roasted garlic than fresh. Buttery, creamy, and very flavorful!

-Image courtesy of Chiot's Run

This site has some good info on scapes. Here's another article from the Washington Post. Looks like i missed out on the best scape harvest: the scape is the stalk holding up the bloom, not the bloom itself, and is tender and mild in flavor. I waited until the stalk got a bit tougher to hold up the bloom, but before the blooms opened up. The blooms were delicious, and the tough stalk softened decently in recipes and tasted nice and mildly garlicy. The scape would be great in pesto - i must try that next year (when my stupid garden rotation timing is hopefully better and my basil is actually grown instead of waiting for the harvest of onions in the basil beds) or as a substitution for the basil for a full own garlicy-pesto feast!

All my research on scapes has lead me even more to believe that i should have waited about 2 or more weeks from scape harvest to bulb harvest. Well, again : hopefully next year i'll have more time and more efficiently managed space! That is if i can get the chickens to understand the new bed in the back is for PLANTS not DUST BATHS. Sigh.

Here's to learning new things!
On that note, i just want to wax philosophical on how much i love being a gardener: I've always loved learning, was sad when i had to leave school (though appreciated earning money to do what i love instead of paying to do it), and fell into a pattern of routines. When i decided to better myself as a gardener, learning took a whole new role in my life! Here is something i want to do and excel at for the rest of my life, but doing it faces daily, weekly, seasonally and yearly challenges and rewards. What better past time, activity, passion to get involved with than gardening to stimulate the brain, body, and spirit?! I love learning new things, whether by research, reading, conversation, or trial and error. Gardening is just the best! (sappy interlude over).

Tuesday, June 1, 2010

Aaah, My House Smells Like Garlic!

I harvested my garlic yesterday. All of it. I won't know how many pounds until it's all cured, trimmed and i weight it. Honestly, i should have kept it in the ground another 2-3 weeks, but the leaves were sufficiently browning and the peppers and eggplants waiting for space could wait no longer!


Here's a bit of sillyness while i try and learn how to braid garlic. Tried. Failed. Good enough for me, though. I planted two varieties, and of course picked them all at once without paying attention to my carefully separated plantings. Ah well - i can only plan as well as my inevitably hasty execution. One variety has much harder 'necks' than the other, though i don't recall if i ordered a softneck and a hardneck. The softer ones were wrastled into a 'braid' of sorts, the harder ones had to be tied up.

Braid: Fail.
Note: i trimmed the roots and leaves off of some of the garlic before reading i shouldn't do this. I'll find out if it causes any harm to the garlic - will probably just dry it out more than i'd like if anything.
I love having garlic hanging around the house. So pretty. One day i hope to have a whole field of the stuff so that i can preserve some in oil, dry some for powder and minced garlic, and use the rest fresh with enough leftover to save to plant next season.

Softer 'necks' almost braided properly. 
I think i need someone to show me the process in person.

Thursday, February 25, 2010

Pita Pizza Recipe, Revisited

I posted my recipe for veggie pita pizzas quite some time ago, but I thought i'd update with a reminder recipe. This evening I'll be adding some chicken sausage to half the pizzas, as my carnivorous father is in town and he likes excuses to eat animals (his wife is vegetarian).
The house is a bit bare of ingredients - but i try and keep pitas and tomato paste on hand at all times, as pita pizzas are a great 'use what you have on hand and i can't think of anything else for dinner' quick fix. The husband and i have decided 2 ingredients are must haves for the best pita pizza, however - so i'll be running by the store to pick up: canned pineapple (in juice not syrup) and black olives. Hubby is always disappointed with a pizza sans pina.

So here we go again, tonight's version of
Miranda's Pita Pizzas

Sauce:
  • 1 can tomato paste (small for two people, large for 4)
  • Splash red wine
  • Finely diced garlic cloves to your preference (i use lots)
  • Dashes cayenne, salt, pepper, basil, oregano
  • Optional rosemary
Pitas (i like Toufayan and local Pheonicia, choose pitas that aren't "pocket" pitas)
Toppings - whatever you like! Here are some suggestions:
  • Onions - raw or sauteed briefly
  • Mushrooms
  • Bell peppers
  • Black olives
  • Diced pineapple
  • Sausage or pepperoni
  • Homemade mozzarella 
  • Fresh basil leaves
  • Tomato slices
  • Feta
  • Jalapenos
  • Zucchini
  • Etcetera!
  • Shredded cheese - any variety
I try to stick with things i have on hand or in the garden. But as i said - we really love that pineapple!

*Note that there is no pineapple on this board. I had pineapple on one list, and went grocery shopping with another list. I forgot the pineapple. 
I failed.
But it was still good, and husband was  happy since i replaced the pineapple with chicken sausage!

Preheat to 425. I usually make these in the toaster oven, but tonight i'm cooking for 4 and will be using the big oven. That heats unevenly. We'll see how that goes. Mix up the sauce - you can do this ahead of time. I like lots of sauce, and it keeps in the fridge just fine - so don't be afraid to make a little more than you might need. Set out the pitas on a baking sheet, or directly on the oven rack (not while it's in the oven, obviously). Slather on as much sauce as you'd like (more sauce needs a bit more time in the oven to crisp the pita, less needs less time). I like to sprinkle just a tiny bit of cheese first, then add the toppings, followed by more cheese. I skimp on the cheese for my pizzas - i really don't think it needs much to be tasty, and load on more for the husband or hungrier guests.

Place in oven and cook for 12 - 20 minutes depending on your oven, rack placement, crispness preference. I often take them out too soon for fear of burning- ending up with a soggier pizza. Don't be afraid to peek inside and lift the pita to see the underside - it can get a little brown on it and it should be firm so that the whole pizza lifts when you lift an edge. Pizzas are easier to cut when crispy, and i just prefer a crispier pizza.  (Cooking on two racks on cookie sheets in oven - rotating the sheets top to bottom half way through - my pizzas cooked perfectly at 13 minutes).

Cut with a pizza cutter and slide onto plates. I served the pizza tonight with side garden salads - i grew every last thing in that salad, besides a cucumber and the olive oil and vinegar of course.


Yum yum yum!

Have you ever gone shopping with the intent to purchase a specific something, and that one thing is the thing you didn't get??? C'mon, tell us your story.

Tuesday, February 23, 2010

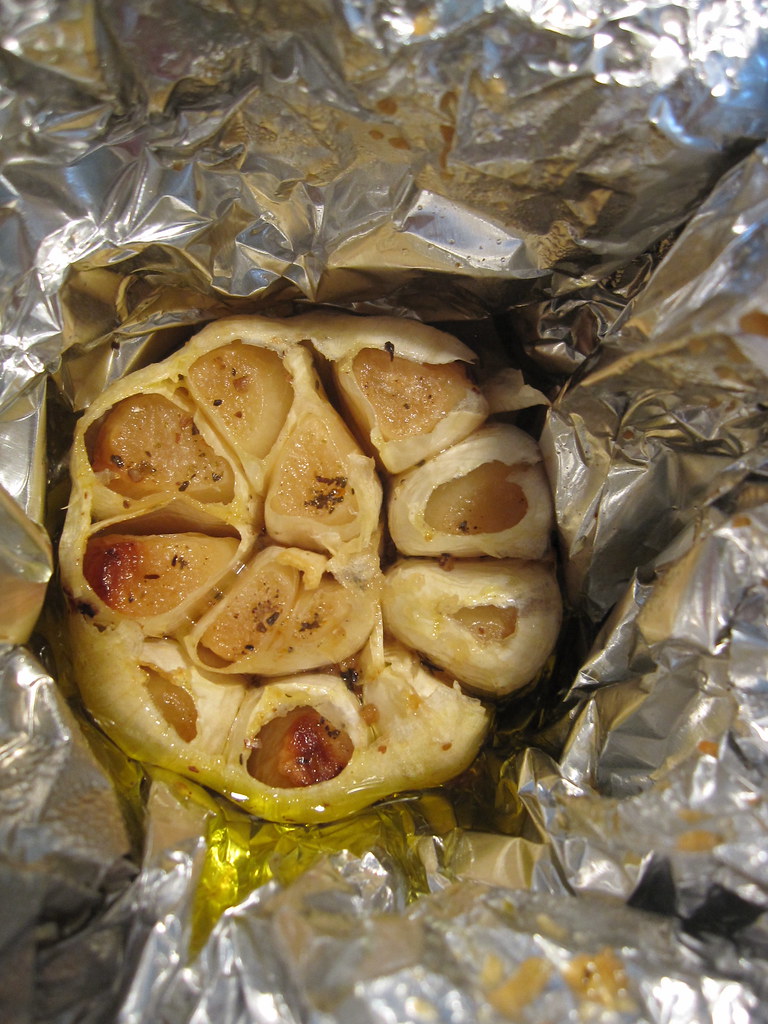
Easy Roasted Garlic Recipe

Well, my my. I had no idea i hadn't already posted this. I was about to make some mayo and wanted to make this batch with some roasted garlic in the blend. I searched my blog to find the temp and time, and low and behold i had not posted this after all.
Roasted garlic is super yummy, spreadable, and adaptable. Mix it with butter, mayo or cream cheese to spruce up those condiments. Slather it onto bread straight, or mix it into just about anything for a garlicy flavor that is less "sharp" than raw garlic. It's more mellow and not as spicy. Plus the olive oil you use to roast it becomes infused with a lovely garlic essence that's great to use in salad dressings or as dipping oil.

How to:
Simply cut the papery top (opposite of root side) with a sharp knife. You want to cut the top of each little clove in the bulb, just exposing the inner flesh without cutting off a ton of the meat - maybe a half inch at the most.
You can use muffin tins lined with foil, or just make little foil packets, or nestle several bulbs in an oven-safe dish and cover with foil. Place the bulb in the foil root side down, sprinkle with any seasonings you may like (salt, cayenne, basil, etc) and drizzle well with olive oil. It doesn't need to be submerged, but oil should get into all the crannies.


Roast for about 30 minutes at 450 degrees. At about 20 minutes in the delicious smell of garlic will be intense! Be careful when you open that packet - hot steam will come rushing out (along with some delicious garlic aromas). Allow garlic to cool some as you don't want to burn yourself on that hot oil, and easily squeeze the cloves out of their paper wrappers. Store in fridge whole, or squish out the cloves and discard the paper part (lick all that good oil off first).


Ta da, that's it. Don't burn your tongue, but eat at least one clove while it's still warm: soo devine.


What's your favorite way of using roasted garlic?

Sunday, February 7, 2010

Homemade Crackers

My lox is ready! What better way to celebrate (other than bagels and cream cheese which WILL HAPPEN) than some homemade crackers. This was my first time making crackers - and i have mixed feelings:
A. i may never buy crackers again as it is sooo easy and cheap to make and i can flavor them exactly as i see fit
B. i may never bake crackers again as they are so freakin' delicious i can't stop eating them!
hahaha.
Anyway, the recipe i used is a mix of several cracker recipes i found online from Towards SustainabilityChowhound, and Bliss Tree. I added fresh herbs and pepper from the garden and chose the oils i prefer:
  • 2 cups flour
  • 1 tsp finely chopped fresh rosemary
  • 1 pinch finely chopped fresh oregano
  • 3 cloves garlic, also finely chopped
  • 5 chile pequins, mashed
  • 1 tsp baking powder
  • 1/2 tsp salt (i used fine sea salt)
  • 1/3 cup oil (i mixed olive and safflower)
  • 3/4 cup warm water
  • +garlic salt for topping
Pre-heat oven to 400. First mix the dry ingredients, then add first the oil then the warm water. Mush to form a consistent dough. Divide in half and roll out on two greased cookie sheets. I would roll them out thinner than i did and get to the far sides of the cookie sheets. Sprinkle with garlic salt and cut with a pizza cutter. Bake for 10-12 minutes.
Mine did not get totally crispy in this time, i used whole wheat flour and didn't roll them as thinly as i could have. I recommend either rolling them more thinly, or increasing cooking time to at least 15 minutes. I rebaked them after they'd cooled by 4 minutes and now they're perfecto.


These are SO GOOD. They taste a lot like those rosemary crostini crackers you can get at Whole Foods, but less oil or sourdoughy.  They filled the house with a delicious garlic smell, and readiness was determined with the sound of sizzle, slight browning, and a lifting of the edges and puffing of the center.


The lox is also super good. Maybe a little dilly - i have a hard time pegging dill as a flavor, but the husband mentioned "dilly." It was tricky to cut up without wasting, but the chickens and dog appreciated the skin. We're excited to pair it with bagel, as the crunch of the cracker was a bit discordant with the smooth of the salmon.
**next day: yes, i think the lox is perhaps 'too dilly' Next time i'll season with more fresh chives and a little less dill, and maybe def use all the sugar/salt mixture - i didn't use it all this batch as it seemed to be more than necessary.

PS: i stored the lox on a sheet of wax paper in a freezer ziplock. Two bags in the fridge, two in the freezer.


Can't wait for my next cocktail party so i can serve from scratch crackers with my from scratch dips.


Things just keep getting better and better around here.

Monday, February 1, 2010

Baked Macaroni & Cheese

No flavor dust, Velveeta or skim milk here! No sirree. I made butter in the morning and used the buttermilk with dinner - I think i finally bested my favorite of my mom's baked mac & cheese attempts. The only thing i was missing was some bread to make bread crumbs on the top. I'm pretty sure if i DID top this with breadcrumbs, my flavor sensors would have been overloaded with deliciousness!

Ingredients:
  • 2 cups (16 oz mason jar) fresh, raw buttermilk. (Can sub cream or milk)
  • 1/2 finely diced onion
  • garlic powder, dried basil, salt and pepper
  • polish melty cheese (can use any nice melty cheese) shredded, about 2 cups or so
  • 1 egg
  • dollop butter
  • dollop flour
  • macaroni - i used shells
Put your salted pasta water on to boil. In the meantime saute a spoonful of butter and flour together in another pot, adding buttermilk a little at a time. Work out the lumps. Add the spices and onions and simmer for about 10 minutes. Toward the end temper in one egg.
  • Tempering is a fancy word for 'get the egg used to this hot temperature.' If you don't, you'll get scrambled egg floating about in your sauce. You don't want that. Scramble your egg and slowly add spoonfulls of the hot sauce into the egg. Once it's no longer eggy and is mixed in add it to your sauce and keep mixing to integrate it.
Cook your pasta al dente and have a 2 quart casserole ready. Preheat oven to 350. Drain your pasta and pour half or so into your sauce and mix. Add 1/3 of your cheese to this and stir it in well. Pour the rest of your pasta into the casserole, cover with the already mixed cheesey pasta and integrate. Add the rest of your cheese minus a little to top and mix in well, then top the whole yummy mess with a bit more cheese. If i'd had breadcrumbs i would have added them to the top, perhaps with some truffle oil.
Bake 30 minutes and let set out a few minutes before serving. This was the perfect amount of time to steam some fresh broccoli to serve on the side.
so good!

It takes longer to bake mac and cheese than just cook it on the stovetop, but there's nothing much more wholesome and homey tasting than baked macaroni and cheese. I love the crispy edges.

Is there a dish that reminds you of home and childhood?

Saturday, January 23, 2010

Planting Spring Onions

It sure feels like spring today, 69 degrees, bright and sunny, light breeze= a perfect day to plant just about anything. It really is still too early to plant most Spring things, but a good time to plant the very last of the cool season veggies and to get an early start on onions.  I may be messing things up as i really shouldn't plant the onions until mid February, but this winter is totally baffling me and i feel i might as well pretend it is going to stay warm, cuz it just might. And if it doesn't, these onion sets only cost 2 dollars so it won't be a huge loss. My rain barrel is full, so the water doesn't cost me anything, and i'd be cultivating these new planters anyway. I say it's a win win.

I also planted some mustard seed today and some kale seeds. My winter crop of kale is completely depressing, but i will not be defeated! Try Try Again!

As always, i picked out the variety of onion i wanted, then immediately forgot which i picked. I THINK that i got a Texas variety of white bermuda that matures in about 90-100 days and stores up to 3 months after being cured in the sun for a week or so. I wanted an onion that stored pretty well for this early batch, I plan a second batch in about a month of either a sweet or red onion. My plan is to grow the onions in my new planters out front, harvest green onions as they grow allowing some to bulb quite large, then follow with my Summer planting of basil. This new location has a lot of sun so i think the basil will like that spot and the time the onions take to mature should put their harvest at just the right time to plant the basil.

I almost feel silly planting more onions. I have a patch of perennial 'walking onions' that are doing great - but i wanted the regular old bulbing onions as well to eat raw in salsas and things.

I chose to plant some lettuce seeds, a good companion to onions amongst them. I planted the onions a bit close together: about 2-3 inches apart. Onions are happiest at about 4 inches apart, but by planting them closer i maximize my space and can harvest smaller scallion type onions while thinning them out as they get bigger, leaving about half to grow to their full size.


I prepared my beds with Texas Greensand, soft rock phosphate, lots of compost and some molasses. I set each onion start into a finger hole of soil, about 2 inches deep. I then sift the soil around it, press down with my fingers and lift the little onion up to be about 1/2 inch deep. This helps the roots to be dangling down deeper in the soil instead of all flumuxed in a tangle around the tip of the onion.


The large bulbs left to get big should mature in about 2-3 months, depending on the weather, etc.  Harvest when the greens start to droop back and the bulb has swollen. Pinch off any flower stalks that come up. Onions like a lot of fertilizer to get good and big. I will side dress with a nitrogen rich fertilizer several times during the season, starting when they've reached about 8 inches tall and repeating every 3 weeks or so (if i remember!)


Onions are a must in every garden. They can be planted in the Spring or Fall. They're a good companion to carrots, lettuce, dill, brassicas, strawberries,  peppers and tomatoes. Keep away from peas. Last year i planted them here and there in my garden and they did well, as did their neighbors. I found it difficult to keep track of them, however and chose to dedicate planters to them alone this year.

Plant onions for their attractiveness, their helpfulness in the garden, and their healthfulness. Onions and garlic should find their way into at least a meal a day. I use them to aid in my healthy saute technique: the moisture within onions is released under a lid and allows me to cook things that would otherwise need oil with simply a moist, steamyness. They are delicious, versatile, and chock full of vitamin C, antibacterial and antifungal properties. Onions may help to reduce cholesterol and lower blood pressure.  Whenever i hear a friend say they're getting sick my answer is always this: "Drink some white tea, and eat a bunch of garlic and onions."

So, Here's to your health!

What is your favorite variety of onion?

Wednesday, December 9, 2009

Mashed Cauliflower/Potato with Herbs and Garlic


Scrumptious!
A while back my friend in New York asked how to mash cauliflower. I mentioned some ideas, but was really shooting off the hip as i'd never made such a thing before. i was wandering through  my local market and saw some cauliflower, i thought to myself "i've been eating like a pig lately, it would be nice to make a low cal but hearty meal tonight" and purchased a head of cauli and a medium sized white potato. Along with some fresh herbs from the garden and some olive oil i roasted some garlic in the other day, this turned into quite the feast.  Accompanied by the first eggs laid by our girls, this feast was fit for a king!

  • 1 head cauliflower
  • 1 medium white potato
  • 3 garlic cloves
  • 3 ice cubes of turkey stock (about 1/2 cup)
  • fresh rosemary, diced from 2 inches of stalk
  • 1 jalapeno, chopped
  • salt and pepper
Cut Cauliflower and Potato into uniform sized chunks. Boil together in a large pot, just barely covered by water, until potato is soft enough to poke a fork into without resistance. Drain off all liquid (save it to mix with your chicken's mash or pour into compost) and put drained veg into a good sized mixing bowl.   While the veg was boiling, mix together remaining ingredients in the mixing bowl - heating briefly in the microwave to melt the turkey cubes.  Place cooked veg on top of ingredients in the bowl and blend well with an immersion blender. This makes a very nicely whipped and creamy mashed potato like dish without the heavy carbs of straight potato. Next time i will try this without the potato to see if the cauliflower can carry the dish on its own. 
I served the potato drizzled with some garlic olive oil (Yum overload) and more salt. For the hungry husband I also served with a link of chicken sausage and some meunster cheese on top. (I added a little cheese to my seconds, it was reeeaaal good).
I served the whole meal with the first fried eggs from our chickens - they were uber flavorful and delicious. I put some ketchup on the plate, but regretted that decision. Yard fresh eggs do not require ketchup to make them palatable, the ketchup just got in the way.

Mashed Cauliflower With Potato and Garlic on Foodista

Friday, December 4, 2009

Tamale Pie

It is about to snow, the bell pepper has been harvested and turned into a green snow deflector for the other viable plants, jalapenos harvested, poblanos harvested, and an attempt at baking tamale pie is at hand.I've never made this before, so we'll see how it goes.
The recipe is not exact as i just threw together what i had in the garden, but this is an approximation of such.
  • 2 roma tomatoes, chopped with liquid set aside for corn meal misture
  • several bell peppers, about a cup
  • 2 jalapenos, one with seeds removed
  • about 1 or 2 poblanos (mine are sillysmall)
  • cumin
  • salt
  • pepper
  • garlic, 3 cloves chopped
  • cilantro to taste
  • one onion chopped
  • some cheese
  • one egg
  • 1 can black beans, drained
crust:
  • 2/3 cup corn meal
  • teaspoon salt
  • one smaaaal habanero finely diced
  • 2 cups cold water
  • drizzle honey
  • forgot to add the 1 tablespoon olive oil, woops!
Saute the filling stuff until soft, add can of beans, set aside and later add some cheese, mix in. I added an egg for extra protein.
Meanwhile put the water and cornmeal mixture in a pot and heat over medium until thick, stirring like crazy. Took about 10 minutes total. You are supposed to add some butter, i was going to use olive oil but forgot - so we'll see. Added some honey instead of sugar. Mix mix mix until the mixture is thick. Not sure if i got it thick "enough" but it seemed good and pastey.
Line a greased pan with half the cornmeal, add the filling, add more cornmeal. About 5 minutes pre eating time add some cheese to the top if you want.
375 degrees, 45 minutes.


Was pretty tasty, texture a but "mushy" might just make cornbread to go along with the sauteed "filling" next time. Also not nearly as spicy as i thought it would be.
Served with Coleslaw.