Tuesday, January 31, 2012

"Shake and Bake" Chicken

No, this is not the recipe that you are thinking of. No preservatives, boxes, pre-packaging or styrofoam was harmed in the making of this meal. And let me tell you, I have found my absolute favorite way to prepare chicken! Easy, quick, wasteless and delicious. What's better than that???

Although we can't afford to buy pastured, organic chickens from our local farmers, i have committed myself to never purchasing packaged chicken that's already been 'convenienced.' This means no buying "chicken breasts" or boneless, skinless anything. I buy Foster Farms whole chickens at the local market... I'm sure FF isn't the most humane, ( but maybe it is? ) but it is affordable and grown quasi locally, sourced from Oregon or Washington farms. By purchasing a whole chicken, i'm skipping the packaging (plastic wrap, styrofoam, etc) otherwise found in pre-butchered chicken, plus i get the whole bird, leaving me bones and giblets for making stock or feeding Pocket.


Sustainability aside, buying a whole chicken does add an element of work, but really not much. I have a nice meat cleaver that i sharpen often, so hacking the thighs and wings off is easy, as is shaving off the breasts. Pocket always gets the wings, but the breasts and thighs are saved for the humans of the family. I often roast the chicken whole, but chicken grease is just too delicious to not be eaten with gusto, and we usually eat it all in one sitting, rarely leaving the sandwich meat leftovers originally planned for. While searching for a better 'diet friendly' option for cooking chicken, i've tried curries, bakes, casseroles and anything else you could think of... but now i've found my absolute favorite, and it's the easiest to make of all!


Shake and Bake Chicken - Scratch Made
  • 1 chicken/ 2 thighs and 2 breasts, fat and skin mostly removed (i like to leave just a bit of skin covering the large side of the thigh, and some of the breast
  • a ziplock or grocery bag
  • Flour mixture: crushed dried bread crumbs, 1/2 cup flour, salt, pepper, seasonings to taste: pick a theme and go with it: cajun, italian, mexican, etc    - i used mustard, paprika and sage
  • 2 potatoes
Mix the flour mixture in a bag and toss each chunk of chicken, one at a time until coated. Before tossing, preheat the oven and a large cast iron pan (or pyrex baking dish if you're sans-cast iron) to 425-450. Once pre heated, take out the hot pan, melt a bit of butter in it and place the tossed chicken pieces in, skin side down. Enjoy the popping sear sounds! Place a potato or two halved, face down in the same cast iron, nestled in between the chicken parts. You may also wish to toss the liver and gizzrds in the seasoned flour and add to the the pan. Bake for 20 minutes, flip chicken parts (leave the potatoes) and bake another 20.


Easy. Tastes like fried chicken. Stays juicy. Isn't greasy.   = new favorite.

What's your favorite way to eat a whole chicken??


Monday, January 30, 2012

TUTORIAL: Crocheted Produce/Market Bags - Step 1

Crocheters: grab your hooks, string and savvy and let's make some reusable bags! 

These bags are great to take to market, hold onions or potatoes in the kitchen, and even for storing yarn and other goodies in. They roll up fairly small, so you can keep on in your purse or car without taking up much space, yet they expand quite large, depending on how big you crochet the base.  If you already rock at crochet, this will be easy. I've done my best to post this pattern as both an easy to read description for those folks who aren't great at reading patterns, as well as in normal pattern lingo. I wrote in the first tutorial post that we'd be using three stitches: chain stitch, slip stitch and double crochet, and i left instructions for these stitches. However, i remembered that i usually like to use triple crochet for the majority of the bag, so please do your homework and get ready to triple crochet in the next post.
So, without further ado: we commence the tutorial!

* I must first start out with a disclaimer.... i am not a master crochetist. I often make mistakes, crochet into half the stitch instead of the whole stitch, am notorious for 'winging' most 'patterns' and have never written a pattern before. That being said, this bag pattern has lots of room for error, there are many ways to skin this cat, and i think you'll have fun doing it. Hopefully you even have fun trying to decipher my instructions. Please also see the second disclaimer at the bottom of this here post. *

Abbreviations used: ch: chain, slst: slip stitch, dc: double crochet
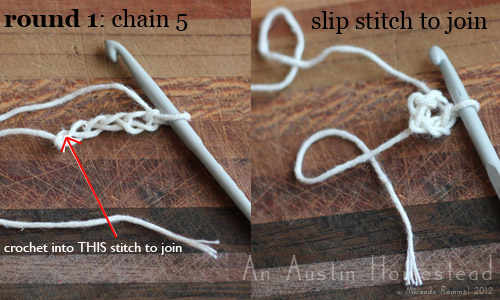
Round 1: ch5, slst into 1st ch after slip knot to join: makes a tiny circle
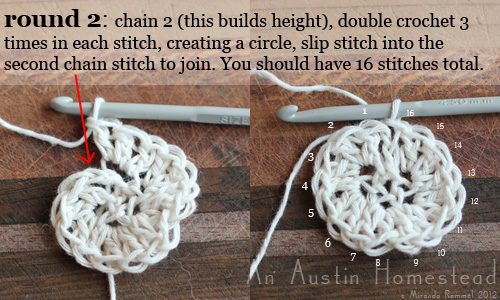
Round 2: ch2, dc3 into eatch st of the foundation chain (makes 16 stitches)
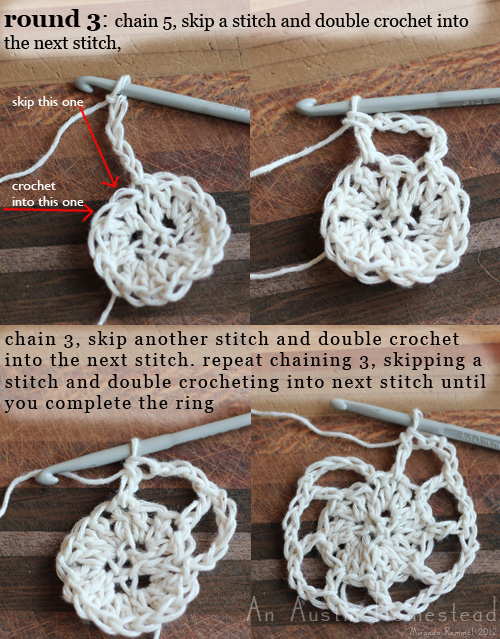
Round 3: ch5, place marker in st on hook, dc into next st (meaning skip 1 stitch and crochet into the next stitch), *ch3, dc in next st, repeat from * 6 times, stopping at marker
be sure you're crocheting under the two loops of the stitch, not just one. If you crochet 'incorrectly' you'll get a ridge between your two rows. Check out this diagram )
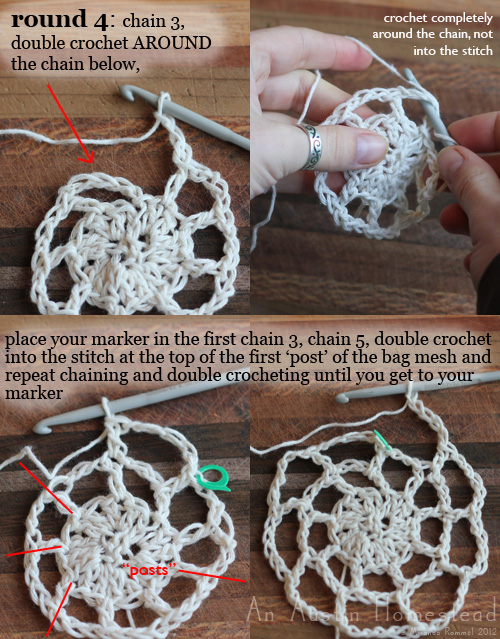
Round 4:  ch3, dc around the chain (instead of into it), move marker to this chain, chi5, *dc into next dc "post", ch5, repeat from * 7 times, stopping at the marker
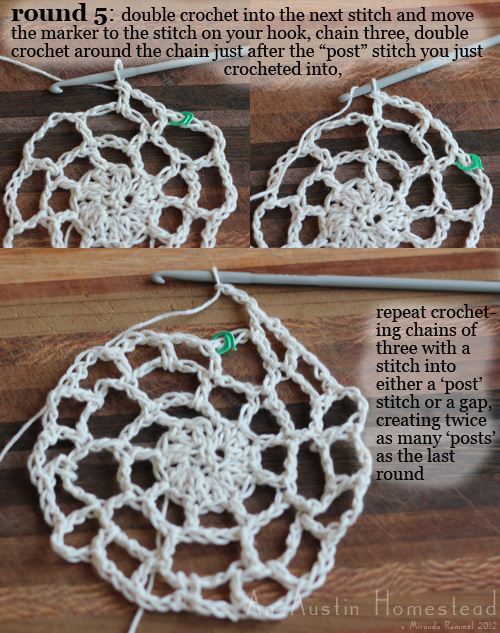
Round 5: dc into the stitch with the marker, ch3, move marker to this chain,  ch3, * dc into next "post", ch3, repeat from * to the marker
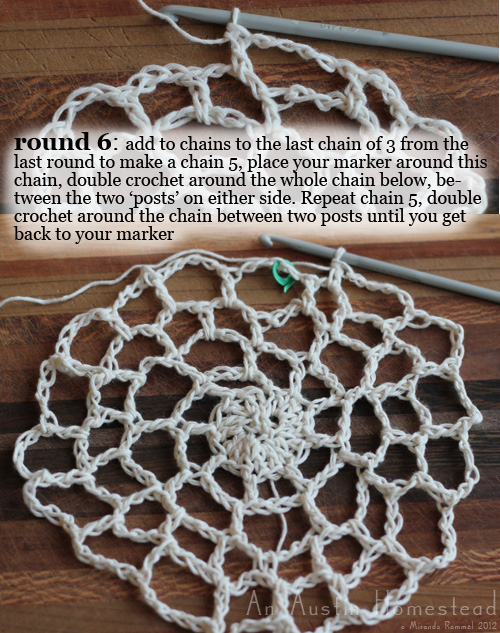
Round 6: add to more ch to make a chain of 5, dc around chain, move marker to this stitch, ch5, skip the next "post" and dc into the chain

Sound like jibberish? Here's an 'english' version, with pictures!

round1 round2 round3 round4 round5 round6

Remember that if you don't have cute little markers, you can use a loop of different colored yarn or string, a twist tie, or even a paper clip. 

At this point, i like to use triple crochet for the next round and the rest of the bag. SO please do your homework and learn the triple crochet stitch. Hint, it's just like double crochet, but you yarn over TWO times before crocheting into the stitch, and pull through three times instead of two times: thus triple crochet. We'll stop here for now and continue on Friday with the base of this market bag, continuing to get you on your way to completing your very own market bag! You get to decide how big you're bag will be based on how wide you get the base circle and how long you continue crocheting up the sides of the bag.

As always, i welcome emails and questions, and want to see your progress! So, be sure to join the Flickr group and post images of YOUR creations!

A few resources to help you out if you have questions:
learntocrochet.lionbrand.com/www.anniesattic.com/crochet/
Ravelry.com
www.crochetspot.com/category/tutorials-and-help/


*Our market bag pattern, and all tutorials found on this site are presented for your personal use only. Tutorials and/or objects made from my tutorials may not be sold commercially (that includes Etsy or Ravelry!). If you want to sell something based on one of my tutorials, please email me at gonudesoap at gmail dot com and we'll try to work out a fair deal. Please play nicely!

Friday, January 27, 2012

Market Bag Tutorial: Gather Your Supplies!

It's almost time to get your crochet on, people! A few of you have already clamoured for details, but for those of you who waited, this is what you'll need:

  • 1 spool of basic cotton string. You could use any sturdy yarn, but you don't want anything bulky, fuzzy, or woolen. Hemp would probably work, but it's a bit stiff. This basic string from the hardware store will do just fine
  • Medium sized crochet hook. You can use the lightweight plastic ones if that's all you have, but i recommend a metal or bamboo hook as i've been known to snap a hook during heavier projects.
  • That's it! Though a crochet marker or extra piece of thread tied in a half inch loop would be helpful.
Now for the skills needed. I meant it when i said only basic crochet skills are needed. We're going to be using three stitches: chain stitch, slip stitch and double crochet. That's it. You can find instructions for these stitches in ANY crochet book, online, from a friend and from these ridiculous videos i filmed yesterday. Which means you will now hear my actual voice, not just the type written one. Let's see how many of you make fun of my lisp!


I'm sure you could also find many more and better tutorials on YouTube. If you're a total beginner, check out that site for lots more how to videos. I should have filmed over my shoulder so that you're not looking at the stitches backwards...  but here are some photos to help out as well:


So now you know what you need to get ready for our crochet along on Monday. Head to your local yarn, fabric or hardware store, your basement or your private stash and let's get crackin! For fun, i've created a flickr group for showing off our progress. I hope you'll join the group and share with us! You don't have to join to see what others are doing, but it would be even more fun if we could see your projects too! You can also post any recipes or other projects inspired by this blog, up to 10 images a day! Yay!

What to expect on Monday: bring your thread, hooks and savvy and get ready for a free pattern* with some variations and room for personalization. We'll start with developing the base of the bag, using chain stitches and double crochet, crocheting in the round. Having a stitch marker on hand will help you to count your stitches.


*Our market bag pattern, and all tutorials found on this site are presented for your personal use only. Tutorials and/or objects made from my tutorials may not be sold commercially (that includes Etsy or Ravelry!). If you want to sell something based on one of my tutorials, please email me at gonudesoap at gmail dot com and we'll try to work out a fair deal. Please play nicely! 

Excited? I sure am!  See you next week!

Thursday, January 26, 2012

Choosing a Raw Diet

Since choosing to feed our corgi, Pocket a raw diet... we've had lots of factors to consider. Where to get our supply of meat? What type of meat to feed? How often? How much? What "philosophy" will we follow: B.A.R.F., raw meaty bones, whatever is on hand with no rhyme or reason, should we stop feeding kibble altogether or feed some occasionally? Will we consult a nutritionist, or just follow our common sense? We've come to a few decisions, and we're still working it out with the help of Pocket. So far, so good!


Supply of meat: local. We're open to roadkill and hunting if the opportunities present ourselves, but we've found an excellent source of goat/pork/ and lamb meat just north of town: Winns Livestock and Hatchery. Initially, we found a great source of 'meat' from a butcher about 40 minutes up the road, and still have a few butchers to call up for alternative sources... but the first butcher sold dog food in the form of ground beef (muscle and organ meat). And we've sense decided that what she needs is meat and bone. (Pocket is seen here consuming ALL of a goat neck, from the flesh to two vertebra).


Philosphy: The ground meat, along with chopped veggies and other raw human-grade meat was a great start, but we've since decided that going with the 'raw meaty bones' philosophy makes the most sense to us. I purchased the book "Work Wonders: Feed Your Dog Raw Meaty Bones" by Tom Lonsdale and read it cover to cover. His website, rawmeatybones.com (which i haven't visited yet) has more resources and forums, and i feel that feeding meaty bones that require Pocket to pull, chew, "floss" and gnaw makes more healthful sense than feeding already ground up meat. I still feed her chopped veggies, in season and supply her with chunks of meat, but the majority of her diet is now fed from raw meaty bones. And when we're talking meaty, we're not talking a bone with some meat on it, we're talking about a leg of critter, covered in all the good stuff and consumed down to the last swallowed bone chunk. Eating is a workout, strengthening her jaws and shoulders and cleaning her teeth all at once.

So now we have both source and philosophy down, it's time for implementation. Along with meaty goat and lamb bones (and potential pig/sheep/goat heads and other weird body parts) purchase specifically for Pocket from the local farm and butcher shops, she'll also enjoy bones from human grade food, that would otherwise be wasted or saved for stock making. I only buy whole chickens when i want chicken meat, so i have plenty of chicken carcasses coming through the kitchen. When i have plenty of homemade chicken stock on hand, i'll save the chicken frames and backs for Pocket's meals. If i need to save a few for stock making, she'll have to eat something else. If we happen to buy some bone-in red meat, i may cut off the meat for us and save her the meaty bones.  "Reduced for quick sale" meat is a great option for us and her, and one can usually find gizzards and other cuts in the grocery store. Utilizing 'spare parts' or less popular/old cuts of meat, and sharing the edible portions from the meat we do purchase becomes cost effective, resourceful, and healthful for the whole family to utilize as many parts from the animals/meat we choose to eat.

Now that we've decided what philosophy and source we'll be feeding by, the proof is in the pudding: Pocket's coat is shiny and soft, her teeth are getting cleaner and her itchy ear scabs have cleared up. Are you interested in the pros and cons of a raw diet for dogs? I'd be happy to post more about my research and experience, and i'd love to hear from you if you feed your dogs/cats raw meaty bones.

Shall we continue this conversation?

Wednesday, January 25, 2012

Beazell Forest

Just up hwy 223 (from the junction of hwy 20, just west of Philomath) is Beazell Memorial Forest. Hidden under the trees are mushrooms, ferns, streams and several miles of lovely hiking paths.


Signs of the recent floods were obvious, and water still ran down many of the steeper paths. We very much enjoyed our trip into the fog and ferns, and Pocket is still sleeping off her eager romp. With a hill steep enough to warm my core and work up a sweat, you can be sure we'll be back again soon.

Do you have a favorite trailhead near enough your house for frequent day trips?

Tuesday, January 24, 2012

Black Bean and Goat Chilly

While everyone else in the country (it seemed) was watching a football game, we the televisionless couple cooked some chilly in honor of the sport. We paid a visit to a local farm last week to pick up some meaty bones for Pocket, and some goat meat for us. Winn's Livestock and Hatchery just north of Corvallis has affordable meat raised by a  4th generation farmer and his very friendly wife. April chatted back and forth with me via email to decide what was best for us to purchase, and we ended up with a freezer full of bones for Pock, a pound of ground goat meat for us plus a shoulder steak that i'll cut up into stew meat in the next week or two. *More about the nutritional facts on goat meat coming soon.


To preface, i am no master of chilly. Sometimes my chilly is soupy, sometimes thick. Sometimes it just tastes like bean soup, other times i master true 'chilly' flavor. This batch was kind of more bean and meat soup, but it was freakin' delicious bean and meat soup. Topped with a little shredded cheese, in season (and cheap!) avocados and a dollup of homemade yogurt: protein, a little fat, probiotic, balanced deliciousness!


I started by soaking some black beans in a stock pot over night. The next afternoon i poured off the water, covered the soaked beans with water and brought to a boil. Meanwhile i browned the pound of goat meat with a few chunks of bacon, seasonings (taco seasoning from a Seattle market), chopped jalapenos and a diced onion. Once the meat was cooked, i poured it with the fat into the beans along with some chopped carrot, another diced onion, some more jalapenos, a few pinches epazote and a generous pinch of cumin. I turned the mixture down to a simmer and covered it with a lid. The stew/chilly/soup hung out for about 3 hours until i added some frozen roasted tomatoes (with garlic) and a little salt and homemade raw apple cider vinegar. Never add tomatoes/vinegar/salt to beans too early on: you'll get beans that never soften! After adding the final ingredients, i simmered for another few hours until we were ready to eat. This definitely did NOT taste like watery beans! All the flavors emalgumated very nicely and formed a lovely, thick texture.


Fist pumps all around!

Are you picky about your chilly, or can you 'go with the flow'?

Monday, January 23, 2012

Are You Ready for Some Crochet!?

Football season is gearing up and winding down at the same time, so it's time for 'us girls' (total gender stereotype there, sorry) to get something to do with our hands during the big games, other than stuffing our faces with nachos. I mentioned it before and got resounding support to host a crochet tutorial, so it's time to get your hooks out, crochet-savvy ladies and gents! Let's make some market bags! They're great for picking up produce in the store or farmer's market (be sure and weigh your bags at home so that you can subtract the cost of the bag when weighing your produce), for carrying your purchases, or even for storing onions or potatoes, etc in the kitchen. For the purposes of this tutorial, we'll be calling our project "market bags."

I will post this tut in a few posts, first with materials needed, then with the first step for the bottom of the bag with several variations, and then the completion of the bag.

Here's what we'll be making:


Excited? Tantalized? Eager to learn this basic but sometimes hard to find (esp for free!) pattern? You should be. It's great fun, totally customizable and only requires basic crochet skills. Gather your friends (tweet this post, share on facebook, email to your bestie) and get ready for some crochet! Step one coming THIS FRIDAY, WOOT!. You'll have the weekend to gather your supplies before we start the meat and potatoes of the project on Monday and finish the next Friday.... just in time to hone your skills before Superbowl Sunday.

I hope you'll play along, too!

Friday, January 20, 2012

Floods in Philomath

Philomath, and local surrounding areas, are facing some tough times. For once, i'm happy to be living in this apartment, on the north and HIGH side of main street. The Mary's River crested this afternoon at record heights, and she took some homes, cars, streets and farms with her. I hope to take some better shots today, but yesterday was a work day and i was only able to snap a few pics on my lunch break.

Philomath Flood Philomath Flood Philomath Flood Philomath Flood Philomath Flood

That last shot is of the parking lot of my workplace.... my low slung hatchback was not at all pleased that i decided to go ahead and drive through that mess. My thoughts and prayers are with all those affected by this flood. From the homeowners with a serious mess on their hands, to Gathering Together Farm with all their farmland covered in water, local residents will have a serious cleanup to face when the waters recede. I just hope the Mary's leaves some topsoil behind.

Local highways and roads to and along the coast are also facing erosion and mudslides. If you must travel, be sure and check with the roads services to see where closures and delays may impede your progress. Back in Texas, we had a saying that reminded folks not to try and drive over low water crossings when in flood. Same goes with Oregon: don't play the fool and try and drive down a street covered in flooding waters. We've already had some casualties from cars swept away into streams and rivers. Learn by their unfortunately example and stick to the high and dry road, even if the bypass delays you on your way somewhere. Better safe than sorry!

On the flip side, Eastern Oregon didn't get as much snow as they hoped and are still facing some scary drought conditions for the upcoming season. I wish we could send some of this surplus to them, but isn't that always the way?

Have you ever been victim to mother nature?

Thursday, January 19, 2012

Warm Soup for a Cold Day

Warming soup for a cold day After playing in all that snow, we needed some soup to cup our hands around and to warm our bellies. The snow prevented much of a shopping trip, however so i stuck with what i had on hand. Leeks, being my hubs' favorite of late have been featuring heavy in my recent soups, and 1 leeks goes a long way to creating a delicious soup. The husband says i'm good at making soup. I love that, since i was afraid of soup making for a long time, assuming that some great skill, knack or formula was needed to make a great soup. I was totally wrong. Soup is easy! Everyone should make soup, and no one should buy soup from a can or box. Skip the bpa lined cans, skip the packaging and skip the preservatives and sodium. Just throw together some veggies (you don't even have to chop 'em much), maybe some (preferably homemade) chicken stock and then finish it off with an immersion blender and you've got soup fit for a king and queen! If you don't have an immersion blender GET ONE, they're awesome... or just chop the ingredients finely for a somewhat uniform consistency at the end.

IMG_0516 Warm soup with crusty bread and avocado

Served with a side of locally baked crusty bread (and a totally non-local BUT in season avocado!) you've got a well balanced meal. Remember the Dark Days Challenge? The soup challenge is ON this week and i'm proud of this contribution, even if it doesn't meet quite all the parameters of SOLE food. To prove that making soup is NOT a challenge, even if sourcing all your ingredients locally can be, here's the recipe:
1/2 quart condensed chicken stock *homemade*
1/2 quart water
1/2 a cauliflower *not local (california), in season*
1 turnip *local and in season*
1 leek *local and in season*
some garlic cloves *homegrown*
fresh rosemary *homegrown  by my mama #2 1 hour away*

1 potato *Oregon*
To cook is too easy: put all the ingredients in a pot, cover it, bring it to a boil and reduce to a simmer until you feel like eating, at least 20 minutes after it boils. Hit with your immersion blender and top with some seasoning for a filling and vitamin packed feast. Makes enough for 4, but 2 of you will end up eating it all if given the chance.

Have you ever become master of a dish or technique you were once afraid of?

This post can be found at Simple Lives Thursdays: a great blog hop of recipes and sustainable living tips

Tuesday, January 17, 2012

Snow Day!

Wowee, we got some SNOW up here in Philomath, OR! Inches and inches and it just kept falling out of the sky. I luckily didn't have to work yesterday, though my hubs had to drive to Eugene and back on the treacherous roads. As for Pocket, she mostly just played around.


The drought is still threatening the other side of our lovely state... so cross your fingers for some 'better late than never' snow pack in the mountains.

Monday, January 16, 2012

Handmade Holidays #6: REVEALED!

We've finally done it, we've made it to the final handmade holiday teaser/reveal post. And this one was actually guessed correctly! The photo i used in the teaser post was actually from another gift, but i made two of the same thing... so this was the teaser... what did you think it was??


This photo depicts my 'first attempt' at a braided rug! I was hoping that it would turn out large enough to be a Kitchen Rug for my folks' new kitchen addition. But it turned out pretty small and has become a perfect sit upon pad for my Dad and Mommy #2's hearth... and the second attempt was the grand project of the season for me, and wasn't completed until halfway through Christmas Eve.

First you braid roving, then you felt it, then you sew it together.... each step takes FOREVER and provokes TENDONITIS!
I really didn't get to play much at my folks' house this Christmas because i spent the entire visit sewing, sewing, sewing and SEWING! I think i developed arthritis in my thumb. Which sucks. But the rug is amazing. It actually turned out kind of wonky, because i didn't really learn how to do it RIGHT with the RIGHT materials until i was 3/4s done. But it was for my mom, and moms have to love what you make them regardless of perfection. She dampened the wonky parts and it seems to have dried out just great. I'm very proud of it, at least.


Pretty spiffy, ay? You can almost see in the top image that the center was super lumpy... i got the first brown stripe too tight and it messed up the center. After getting it wet and drying it, however - it seems to have flattened out. Yay! I can't wait to make more of these rugs with the fiber of our own sheep. I bartered some Nude Soap bars for half the cost of the roving i used this time, which was from 4 lovely Icelandic sheep from Michigan.

Have you ever made a braided rug? Did you finish it, or give up along with your wrist/thumb tendons?


Friday, January 13, 2012

My New Favorite Kitchen Gadget

One of my smallest Christmas presents this year is quickly becoming one of my favorites. (Thanks Sister!) If you had paid a visit to my kitchen recently, or joined me in my Thanksgiving prep or been within ear shot of me while cooking anywhere recently, you would have heard some cursing.
Kind of a lot of cursing, actually. What was the cause of this audible frustration? Garlic skin.

That's right, garlic skin has been my nemesis of late. Fresh garlic, especially is hard to peel. That thin skin sticks to the garlic, then to my fingers, then to the cutting board. It makes me want to SCREAM. I doubt my sister knew how pertinent this little gadget is to my kitchen activities, but it is totally my favorite toy (other than my new camera, of course!) It's a garlic peeler!


This unassuming little tube is made of some kind of stickyish plasticish substance that sticks to the garlic skin and magically separates it from the clove. It is truly magical. All i have to do is break off the cloves, stick the into the tube one at a time and roll with some downward pressure. And voila! Separation!


No more cursing. No more time consumption. No more peels of garlic stuck everywhere but where i want them. Just more garlic peeled faster and easier than ever! So awesome!


I dunno where she got it (maybe she'll leave us a comment, ay?) but every one of you should go out RIGHT NOW and buy one!

What is YOUR favorite kitchen gadget? Is it a big ticket item like a Kitchenaid, or is it something small like this?