Friday, October 29, 2010

Brunch Recipes #2: Skillet Taters and Two Fritattas

A. I never know if fritatta is spelled frittatta or fritatta. I'm going with fritatta. Both get little red mispelling lines underneath. But so does misspelling. haha.
okay, focus, miranda.

Vivian's 90th birthday brunch. A success! Good thing i love cooking.

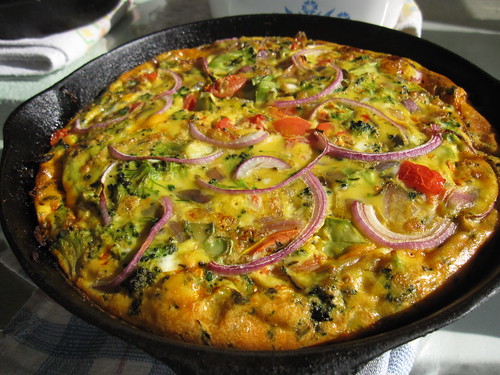
I had a great soux chef for our family brunch: my husband who was dear enough to travel 6 hours to meet my ENTIRE family and then help me stir potatoes for half an hour. What a guy. The potatoes were easy, just required a lot of stirring. You can sub any seasonings you like, add more oil, more onions, whatever. They're easy. I make fritattas about once a week or so, so i've gotten 'back of my hand' with them too, tossing in whatever i have on hand. The main thing to remember about the fritatta: 375 degrees for about 20 minutes, until bubbling, puffed, and fully cooked in the center.

I got to use my grandma's mother's cast iron pans, making the fritattas that much more special.

I cooked two, factoring my grandmother's inability to digest onions or garlic. I also made her her own little dish of onion/garlic free potatoes. Birthday girl gets a taste of everything!
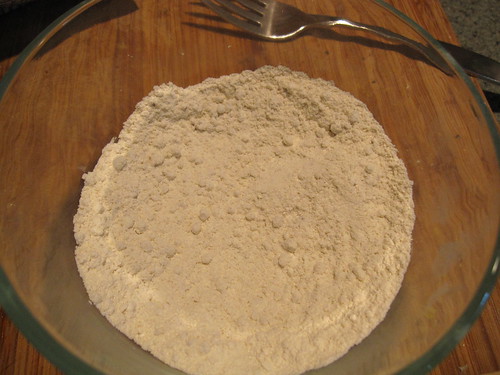
Potatoes
  • A bunch of local potatoes, red and purple
  • Smoked paprika
  • Chopped onion and garlic
  • Fresh herbs: rosemary, sage
  • Salt, pepper
  • Whatever else you want!
skillet taters

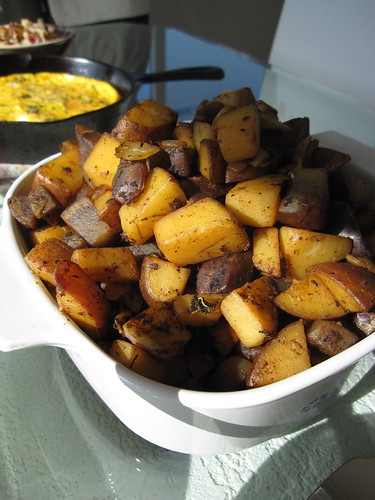
Oil the pan and skillet fry those taters. It was more of a 'move and flip to cook evenly' than a fry - but you get the picture. I could have roasted them in the oven, but it was being used for muffins and fritattas. I think we cooked them for at least 30 minutes.
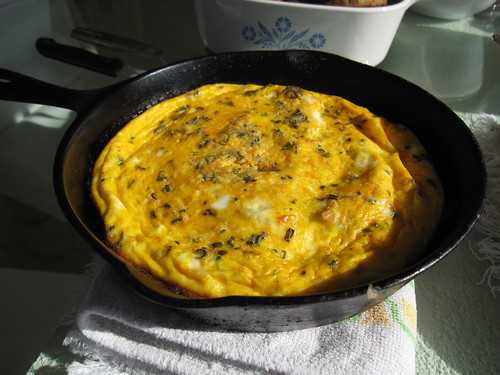
Vivian's 90th birthday brunch. A success! Good thing i love cooking.

Fritatta 1
  • 5-6 eggs
  • Roasted pumpkin flesh
  • Dash milk
  • Fresh herbs: rosemary, sage, basil
  • Local champagne cheese
Fritatta 2
  • Maybe a full dozen eggs
  • Splash milk
  • Sauteed veg
    • Broccoli
    • Garlic
    • Onion
  • Fresh, chopped tomatoes (from my Austin garden)
    • Herbs: rosemary, sage, basil
    • Salt, pepper
    • Sliced onion for garnish
    • Local cheddar cheese
    Fritatta with fresh, local veggies and cheddar

    For both fritattas:
    Microwave a big potato and slice very thin. Meantime sautee the onions, garlic with seasonings adding the broccoli last. Remove from pan. Grease pan(s) and lay down the potatoes evenly like a bottom crust. Whip up the eggs with their splashes milk and their veggies/ seasoning. Pour half over the potato crust, layer cheese evenly as a middle layer topping with remaining egg. Cook at 375 until done - the bigger one took about 30 minutes, the smaller about 20. I liked putting the cheese in a sliced layer instead of shredding into the egg mixture because you got a layer type goo yum instead of invisible cheese calories hiding in the mix.

    Pretty easy and very delicious. I liked cooking the fritattas in the cast iron because it kept them fairly warm up til breakfast time. Test for doneness when you the center puffing up - they're done when they firmly resist pressure, or a fork peeked inside shows cooked egg with no goo (other than cheese goo).

    I think i did a decent job putting together a fairly seasonal/locally sourced brunch menu. I did cook some ham that came from Kansas City, and the fruit salad was bananas and canned fruit :(   but the rest of the 'from scratch' goodies at least were as local as i could get.

    What would you have made your family for a special birthday brunch?

    Thursday, October 28, 2010

    Brunch Recipes #1: Muffins and Applesauce


    I was born in Connecticut. I then lived in Oregon for most of my life. Both of these locations provided me with seasonal bounties of apples in the Autumn. I am still accostomed to this and bought about 30 dollars worth of apples last fall due to the lack of bounty here in the southland. Not this year - i found some sense. Luckily this year also found me IN the northeast to enjoy the proper apple bounty in its very best location and season. My cousin was kind enough to bring a bushel of Maccoun (i always misspell that) apples to Montauk for me to turn into a delicious sauce.

    Had i continued cooking the apples down, i'd have made a finer and denser apple 'butter' but i had socializing, beach walking, and stone collecting to do, so i settled for a simple sauce. Making applesauce is the easiest thing to do - so if you have a kiddo, or just really like applesauce (who doesn't?) make it yourself. Especially if you live in apple country, there is NO excuse to purchase pre made sauce, filled with preservatives, sugar, or just questionably sourced apples. Make your own!

    It's easy:
    Take a bushel of apples. Peel and core. You could even leave the peels on. I peel, but don't mind little stragglers of skin. Compost the peels and cores - keep the cores away from your doggies as apple seeds are poisonous.
    Plop the apples chunked into a big pot along with a pinch of freshly ground cinnamon and cloves, cover and bring to a boil on high. Stir occasionally and keep heat at a medium/high until the apples start to fall apart into mush. Stir some more, maybe add a tiny pinch of brown sugar if you must - tiny pinch only! Keep covered and simmer on low for a few hours.


    I think i simmered mine for about 4 hours or so. Nothing smells better than a simmering pot of apple goodness and it does all the work for you.

    Now for the muffins. These were delicious and one particular muffin was taken hostage by my grandmother as her 'security muffin' (this story is too fantastic not to mention but too silly to type out fully here). Needless to say, Grandma Viv really liked her muffin and had THREE with her brunch. I think i had at least 2 and a half. These muffins aren't too sweet, they're wholesome without being dense, they complimented the applesauce well and would be great with breakfast or dinner.
    I got the recipe from the Harried Homemaker and changed only the flour and the sugar - i used half whole wheat half all purpose flours, and half Rapadura and half granulated sugars. I doubled the recipe to make a little over 24 muffins and calculated the recipe to make about 145 calorie muffins.
    These are not your gooey, sticky, sugary, fluffy, cupcakey blueberry muffins. They're biscuity while still being very muffiny and just darned scrumptious! I'll be making these regularly and with whatever berry is in season. Perhaps some cranberry muffins will be coming with me to Thanksgiving this year instead of the pumpkin bread pudding i'd planned.
    • 1/4 C melted butter
    • 2 cup flour - half all purpose, half white whole wheat
    • 1/3 cup sugar - half rapadura, half granulated
    • 1 T baking powder
    • 1/2 t salt
    • 1 egg beaten
    • 1 cup milk
    • 1 cup berries  - i used frozen blueberries
    Combine dry, make a well and add mixed up wet ingredients and blend within 25-20 strokes. Fold in berries last and cook in greased muffin tins at 425 for about 15-20 minutes. Mine went about 17 and i switched top to bottom, bottom to top half way through: thus burning my hand. First thing in the morning. Shesh.


    A note on the prep: i mixed the dry ingredients here in Austin and packed them all up in an empty flour bag. TSA didn't mind my travelling with cucumbers, tomatoes, muffin mix, or cheddar cheese - though they were curious of my bag of rocks on the return voyage. Prepping the mix in my own bowls with my own measuring cups brought me sanity and mixing in the wet stuff in Montauk was a cinch. I baked these guys fresh for the table the morning of the brunch and all were scarfed down by cousin and uncle alike.

    Cousin James and Grandma Viv ready to pounce on the feast.
     Yum. I want to eat more muffin and applesauce right now. NOW. Dangit, Austin and no apples. Next fall, maybe i will get the sweet taste of apple in my mouth again. For now, i anxiously await my friend's persimmon tree to ripen and be turned into jam by me.

    Back tomorrow with the rest of the menu.

    This post seen at Simple Lives Thursday

    Wednesday, October 27, 2010

    Family Brunch Success!

    My brain is in vacation de-fragmentation mode, so apologies for the lack of Wholesome Wednesday. I'm back in Austin: low 90s, no rain in sight, with a happily growing garden. Much weeding was done upon my return and i'm watering in some new seeds and transplants i planted yesterday. My pansy seeds just weren't coming up, and the calendula i planted from seed was growing too slowly for my taste so i picked some transplants ($30 worth, ugh) at The Great Outdoors. At least pansies are on sale this month!

    Tomorrow and Friday I'll be posting some of the recipes i cooked up for the big family brunch on Sunday. I had SUCH a great time cooking for my loved ones, especially the birthday lady (Grandma Vivian turned 90!) I'm the only daughter of an only daughter of an only daughter - so cooking up something special for my special grandma was a joy. My husband made a great soux chef, and between the two of us and the lovely help with the dishes from uncles and aunts - Sunday was a marvellous afternoon. Complete with lovely sunshine and breeze from the sea!

    I tried to source as many ingredients locally as i could. I stopped at a local farm stand on Long Island for:
    • broccoli
    • cauliflower
    • potatoes
    • onions
    The farm stand keeper and i shared musings over her beautiful mature broccolis and my baby just-growing broccolis back in Austin. It was a brisk day in the low 50s with quite the wind: i was glad to have some good outerwear with me: i may be a northerner by birth, but i've been living the softy life in the south for a good 6 years between Austin and Savannah. Not as hardy as i once was!

    The rest of the ingredients were sourced from the local grocer- not all were local ingredients, but i tried. And i also brought garlic, tomatoes, herbs and spices from my house and garden as well as the muffin mix. No berries to be found in New York at this time so i bought frozen, but my cousin brought down a bushel of Maccoun apples (my favorite!) from upstate and a delicious sauce was greatly enjoyed from their flesh.

    Recipes to follow, here are some pictures:

    Fritatta with tomatoes, onions, garlic, broccoli, cheddar and herbs
    Muffins, applesauce and fruit salad
    How i long for local apples! Soon i'll be back north. Soon.
    Me and the birthday girl.
    Do you enjoy cooking for a crowd? Do you still cook from scratch or do you rely on easy, pre-prepared dishes?

    Thursday, October 21, 2010

    Vacation Mode

    Headed off to Autumnal Montauk, New York.
    Back soon with recipes from a big, family brunch!

    Have a great weekend.

    Wednesday, October 20, 2010

    GIVEAWAY TIME!

    My other self, Miranda R Mueller Illustration is sponsoring a giveaway over at the wonderful Hideous! Dreadful! Stinky! blog - a blog for crafters, mamas, frugal-savvy folk who aren't at all hideous, dreadful OR stinky.

    I'll be giving away one $50 gift certificate that's good for an original 8x10 including shipping, or can be used towards a larger purchase:
    Description: A  gift certificate from Miranda R. Mueller Illustration, good  for one 8x10 name illustration*- original art totally customized for you.  Let the artist  design an illustration as unique as your child:  match your nursery decor,  feature your child's favorite things, or just look darned cute with various animals that share the same first letter of your child's name. Bright happy colors and bold letters stimulate your baby's interest and encourage older children to read their name. Great for baby shower gifts too!  
    *may also be used towards the purchase of a larger piece
    Materials: Recycled content toned paper, prismacolor pencils, ink and optional stitching. Can also create custom sewed pieces from fabric scraps from your nursery linens
    Dimensions: 8x10
    Retail value: $50
    Hurry for your chance to win! Marigold is also offering a different giveaway for each day of this week, so check them all out while you're there. This is the piece i created for Marigold and her two boys, i'd love to make the perfect piece for your kiddos' rooms.

    11x14 original illustration for Huck and Milo

    Wholesome Wednesdays: Alfalfa

    I made a lovely smelling batch of soap with some homemade raw yogurt, chamomile and lavender and plan a batch of lemongrass/rosemary soap today - with alfalfa.
    Alfalfa in soap you ask? Alfalfa is actually good for the skin, not just eaten as a sprout, which apparently is not so wholesome due to some amino acid on the seeds. I don't have my Nourishing Traditions book at home presently, so i'll have to update this post later. I know that eating alfalfa sprouts is great for a lot of other minerals and vitamins, but today i'll be focusing on its benefits to the skin.

    My First Batch of Cold Processed Soap!

    Firstly, I grew my own alfalfa and dried it in my dehydrator - so i know there are no additives or pesticides present. This is not always the case, so if you're looking to source alfalfa locally, try and find a grower who sells 'organic alfalfa hay' or at least 'horse quality hay' and see if they'll let you pick up some scraps from the hay barn floor.

    The benefits of alfalfa sound great to me. This website has some scientifical jargon that explains some of the benefits that eating alfalfa sprouts have on the skin. But what about rubbing alfalfa extract ON to the skin? Alfalfa is a great source of protein, minerals and vitamins C, D, E & K for the skin. It conditions and increases skin metabolism to promote skin healing. This website has some information on medicinal and other traditional uses of the plant. These include:
    • Excellent natural laxative and diuretic
    • Detoxification of the urinary tract, and urinary tract infections
    • Reduces excess water retention in the bladder
    • Excellent natural source of vitamin K
    • Well-known blood and liver purifier of chemicals and heavy metals
    • Eases joint problems, skin issues and foul breath
    • Has a strong alkaline effect on the body
    • Excellent neutralizer for the acids in the intestinal tract
    • Eases general digestive problems, gastritis and indigestion
    • Reduces migraine headaches through combined high magnesium and calcium levels
    • Contains bioflavonoids that stop the inflammation of the stomach lining.
    • Contains high levels of enzymes for food digestion and assimilation
    • Lowers bad forms of cholesterol, and reduces the incidence of atherosclerotic plaques
    • Stabilizes blood sugar levels, particularly when taken in conjunction with manganese
    • Improves pituitary gland functioning
    • Stimulates the immune-system
    • High level of vitamin K adds to the effective healing of bleeding gums and nosebleeds
    • High bioflavonoid count increases blood capillary strength
    • High levels of Vitamin K2 may partially prevent bone loss due to lack of estrogen in menopausal women                 -Global Healing Center .com
     So, from this research i have discovered that the poultice of seeds is most beneficial to the skin, versus the leaves. BUT alfalfa has a super duper long tap root (one of the reasons i planted it in the first place - it breaks of bad soil) that can mine the soil for deeply hidden minerals. So, the leaves must share some of those goodies, even if not to the same quantities of the seeds. If nothing else, they lend a pretty greenish hue to the soap.

    Not the most wholesome of my Wednesdays, but interesting nonetheless.

    Tuesday, October 19, 2010

    Planning a Seasonal Menu From Out of State

    We are headed out to lovey Montauk this weekend for my even lovelier Grandma Vivian's 90th birthday: way to go, Viv! I've been put in charge of organizing Sunday brunch, as it is well known that i love cooking and like the chance to try out my recipes on groups of people, especially groups of family members who are forced to try my dishes and respond honestly. ;)

    IMG_1350.jpg
    The "Living Room" at our family's Montauk house

    The difficulty in this situation is that i'll be planning the meal from halfway across the country, in a very different growing season. That being said, I grew up in Connecticut and should have some idea of what to expect, especially since i've been down here in Texas pining for apple season!

    I plan on focusing on fresh, local ingredients with apples (Macoon please) from upstate NY (Thanks, cousin Jon!) and pumpkins and any other produce i find along our drive of Long Island at various market stands. I'll pack herbs and seasonings from my garden and pantry and might even mix up the dry portion of some muffin batter to bring along - cooking outside of your own kitchen can be confusing and distracting, so i want to bring as much with me as possible.

    orchard
    Apple orchard somewhere in the Birshire Mountains

    The menu will need to feed brunch to 20 or fewer folks, accommodate vegetarians, children, yankees who can't take much heat, and a certain 90 year old lady who has some limiting dietary considerations (can't eat onions, too much iron, too many greens, chocolate, spice, really anything tasty - ha). This is what i've come up with from down South, i'll report upon my return how it turned out along with some recipes:
    • Homemade Apple Butter/ Apple Sauce from local apples
    • Spiced Muffins, or Bread Pudding with Roasted Pumpkin or Apples
    • Frittattas with Roasted Pumpkin and Herbs (from my garden)
    • Fruit Salad
    • Roasted Potatoes with Smoked Paprika
    • Sausage (if i can find some locally made)
    Please feel free to recommend any North East seasonal items i should consider working into the menu. Dang, i'm hungry now thinking about sausage and fresh maple syrup, nom nom nom....... better go take the puppy for a walk to keep me out of the fridge, hehe.

    Wow, ps - was looking through my Montauk visit photos from 2005 and found this shot- this is the Miranda my husband met and fell in love with, about 20 pounds lighter than she is today. Gotta love living your early twenties in a town that you can bike/walk for all your transportation... that and eating nothing but salad, apparently. Sigh.

    IMG_1348.jpg

    Monday, October 18, 2010

    Sour Pickle Recipe #2

    Woops - I forgot to publish this post. You must have been confused when i posted the results of this batch of pickles before posting the recipe. Apologies!
    From October 7th:

    I can't wait to taste these as i expect them to be even better than the last batch! I have two little cucumber plants coming through for me this fall. One is a Perisian Pickling (2 plants survived the entire packet of seeds being planted, sigh) and another is a Marketmore (grown from years old seeds, hot dog). They're both doing pretty well without much help from me and this week i decided to pick several to make a small batch of pickles. I picked 2 rather mature, but still small and the rest from teeny to medium sized - all were perfect for spears (last time i made chips) or whole pickles.


    I lined the bottom of my large jar with grape leaves. I picked the knick of time to make these pickles as the grapes at The Natural Gardener are shedding their leaves quickly. Hopefully the age of the leaves won't alter the taste of the pickles negatively. I also tossed in some black peppercorns and garlic cloves. The garlic is kind of nasty tasting raw - i picked it too late, but it's good cooked so i'm hopeful that it won't ruin the batch either. I also put in a small sprig of dill flowers that i've had frozen in the freezer since early Summer. Two little cayennes also made their way in there, but thats it! Toss it all in, cover with a pyrex lid, pour over the brine (3 T salt per quart of water) and weight down with a vinegar bottle filled with water.  Cover it all with cheesecloth to keep the flies out and voila - i should have pickles in a week or 3. I'll keep you posted!

    The Importance of Knowing Local Plants

    First, let's hear it for the husband! The loyal, faithful, wonderful man who braved the jungle, mosquitos, and rash inducing weeds to save me from my month long struggle with evil allergins: RAGWEED. Thank you, Andy!

    Okay - an explanation. I have been suffering itchy red eyes, itchy throat, thoroughly stuffed nostrils and countless sleepless nights for the past month, month.5. Not a fan. I blamed mold. I blamed the puppy. I DIDN'T blame the forest of weeds behind my house. The lovely forest, enjoyed by my hens, shading the back yard and blocking my view of the half finished construction zone in the back yard.......   the forest of ragweed.

    Untidy backyard with construction zone beyond, previous location of ragweed forest.
    I'd never heard of ragweed other than seeing it listed as 'high' on the pollen count for the past month or so.  I left the weeds in the back for the hens to enjoy, but pulled them as soon as i noticed them flowering as i didn't want them to spread. That was about a month ago --- hmmmm, coincidence? I remember mentioning to the husband "wouldn't that be funny if i was allergic to ragweed and that unidentified forest of weeds in the back was ragweed?"

    Forest of weeds beyond the backyard has been cleared. Now just a forest of grass

    Not so funny after all, it turns out.

    On Friday i finally google image searched ragweed and discovered this, a gallery depicting the very weed in my backyard and beyond. I'd already pulled the weeds from inside the yard, but the forest continued in the construction zone. This is where the loving husband stepped in and saved me. He came back to the house looking like he'd been to war: welts all over neck and face from weeds and bugs,  nose clogged with allergins. This ragweed is pretty intense stuff. I do not own a good guide to central Texas wildflowers/weeds/trees and think i better get my hands on one and keep my bookshelves up to date with the local flora fauna of my place of residence. Because if i learned anything from this long suffering experience, it's the importance of knowing and identifiying local plants and weeds - some could be edible, poisonous, or providers of horrendous allergins and it's nice to know the difference!


    The rest of town may still be filled with flowering ragweed of evil, but at least my immediate proximity is now clear. I've had two whole night's sleep with at least one nostril clear at all times: hallelujah!

    Friday, October 15, 2010

    All Natural Carpet Freshener

    is easy to make and fun to use!

    For clarification: my house doesn't smell. In fact everyone always compliments the usual yummy aromas emanating from it. But Miss Pocket is shedding a LOT and i figure i might as well help the carpet out to smell and feel its best.

    The ingredients are simple and all things i had on hand. If you have a hard time finding food grade Diatomaceous Earth - check out your local organic plant nursery - the stuff sold in hardware stores to kill bugs often has nasty chemicals in it, as does the stuff for cleaning pools. Baking soda is a natural freshener and Diatomaceous Earth helps kill nasty cockroaches and potential flea/other-bug visitors. I combined the two with some essential oils of lavender and eucalyptus (both share antiseptic and cleansing power), whisked well to thoroughly combine the oils and dusts,  and scattered about using an old spice jar. A sifter would have been better but i do not posses such a tool. The DE can dry your skin, so I used about 50/50 DE and Baking soda and vacuum up most of the dust. I like to leave some along the walls and in crannies to attack the cockroaches, but leave the rest to sit on the carpet about 15 minutes then vacuum. The bedroom never smelled so nice!

    Natural Carpet Freshener

    Natural Carpet Freshener

    Natural Carpet Freshener

    You can combine about any essential oils you want, but do some research per the safety to pets - apparently tea tree oil can be bad for them. Both the baking soda and DE are perfectly safe for babies and pets alike. Have fun making your own natural carpet freshener and keep your house safe and smelling lovely .

    Do you make your own carpet freshener?

    Thursday, October 14, 2010

    Pickles #2: Results

    #1: If your raw garlic tastes nasty, though shalt NOT put it in your pickle crock

    #2: If your grape vines are decaying with the fall, though shalt not place their leaves in your pickle crock

    #3: If you should not follow these first two rules, though shalt still eat of thine pickles, as they're pretty good despite the mild nasty-garlic flavor.

    Yes, those garlic cloves did nastify the pickles some, and the mold floating on the top of the brine kinda freaked me out so i stopped the process a day shy of a week. Apparently mold is no biggy when fermenting pickles, but i'm allergic to mold and don't feel the need to place more of it inside my house.

    It's neat to see the process though: just brined, fermenting, end of ferment:

    Fermenting nicely
    Cukes are pickled, brine nasty and murky, mold on surface (and caught by the weight)
    Rinsing off the nasty brine and mold - picking out disgusting garlic mistake
    Re-packed into a clean jar and covered with fermented brine from the last batch

    The last batch never turned all murky and moldy like this and i'm not sure what was the cause of the nasty. BUT the pickles are still pretty good AND they're super crunchy! I'll forgive them their garlicy nast aftertaste - was my fault, after all.

    This post also seen in the Simple Lives Thursday pool.

    Wednesday, October 13, 2010

    Wholesome Wednesdays: Sodium Bicarbonate

    Good old baking soda. I've always had a box open in the fridge, but never really given much thought or consideration to the versatile dust until this past year or so. Since investing more time on learning alternatives to chemicals and modern goops to clean my home and treat my fire ant stings, i've discovered some great uses for baking soda.  Here are some of the ways i've been using my baking soda in the last year:

    • Insect sting relief: When i get a fire ant bite, i score the bite with a sterilized razor blade and apply a poultice of baking soda on top. Sometimes i also add essential oils or mashed borage leaves when i have them. The baking soda helps suck the poison out and prevents the massive swelling i tend to get from those nasty bites.
    • Drain cleaner: Pour some baking soda into a clogged drain and follow with some vinegar and cover it up. A little explosion will happen in the drain and force the nasties down. Follow with some boiling hot water to help further dislodge things and repeat as neccessary. (It helps to scrape out the nasty hair first, if applicable)
    • Cleaning the garbage disposal: Same steps as above. Freshens the gunky smell and gets the grime off.
    • All purpose cleaner: The grittyness of baking soda works well to clean just about anything. Combine with Borax and you have a super hero team of scrubbing power.
    • Biscuits. Yum.
    • Add a scoop of baking soda or borax to a load of laundry for cleaner, softer clothes.
    • Sprinkle some baking soda or borax in the compost pail in the kitchen to keep those funky smells less funky.

    This weekend i plan on creating some homemade carpet freshener. I'll post my recipe and let you know how it works. I plan on combining essential oils with baking soda and diatonaceous earth to freshen the carpet and kill any nasty critters crawling about the house via puppy feet.

    Also, thanks again to Susy at Chiot's Run for inspiring me to make my own toothpaste! I'll be looking for vegetable glycerin to get the consistency nice enough that my husband might actually use it.

    Arm and Hammer has a neat little website feature that discloses all sorts of 'secret uses' for baking soda. Check it out. Some of their tips include:
    • Clean walls or furniture with a paste of baking soda - acts like that magic eraser
    • Adding baking soda to the rinse cycle specifically helps freshen up those sheets even more
    • All purpose deodorizer - that's what that open box in the fridge is for (even though i still bake with that one, gross) and sprinkling it about in the form of a carpet freshener is great all over the place including on pet bedding or anywhere else.
    • Pamper that bod: add to shampoo to get your locks cleaner and shinier, soak your feet, scrub your body, relieve an acid stomach, add to a bath to neutralize the ph and get you cleaner/fresher, use as deoderant.... 
    • Clean off car batteries
    • Clean up oily spills
    • Bring it camping and use it for everything: washing hands, clothes, dishes, teeth, hair, fire extinguishing, EVERYTHING
    • You can safely clean just about ANYTHING with baking soda, right down to vegetables, the dog herself or baby's favorite chew toy
    Wow. That was intense. I never knew the true power of baking soda. I can't wait to whip up my carpet freshener and use it EVERYWHERE on EVERYTHING, not just carpets. So put away those nasty chemicals and stock up on some baking soda. It'll cure what ails ya, or your dirty floor, or toilet, or teeth, or hair, or dog, or............

    How do you use baking soda?

    This post also seen on Simple Lives Thursday

    Tuesday, October 12, 2010

    Rain! And a Reminder

    Many apologies for the quick nature of my posts lately. Things are a bit busy over here and today is filled with Pilates and artwork for me and sheep herding for Pocket. Much to do!

    So, i decided to share a funny story which we've most all shared before. This year i've discarded my old soaker hoses in the front and replaced with a small sprinkler. The cukes don't much love it, but they're not long for this season and the rest of the veggies don't seem to mind. It's good for the germinating babies, as the soil gets evenly moist, but i'm not sure how it will do with thoroughly soaking the roots for the deep, infrequent waterings necessary for healthy veggies. We'll see.


    I still have soakers in the back though - poorly measured soakers that soak half the lawn while watering the broccoli and beets. Yesterday, i turned on the soakers in my morning befuddled state, brought pocket back inside, and thoroughly forgot about turning on the water. The reminder part of this post: SET A TIMER.

    FOUR HOURS LATER i happen past the back door and make an expression like this: !
    I turned off the water, but boy oh boy, four hours of watering makes the broccolis exclaim "We are not bog plants!"

    And then what badly needed weather pattern graces us for the evening? Rain. Of course.

    Little rain worm, missing his eyes.

    My tip - if your garden is ever in need of some rain and the weather man has nothing but dry sunny weather in the forecast - go water your garden really, really well.  It'll be sure to rain that night ;)

    Monday, October 11, 2010

    Tortillas!

    Just a quick little recipe. No pictures. Not really very interesting - but quite tasty and worth sharing.

    Corn tortillas are pretty easy to make, but you do need a tortilla press. I have honed this recipe until quite satisfied, and this is what i came up with:

    1/2 C Masa Harina
    1/2 C Whole Wheat Flour
    Pinch of Vegetable Shortening (Spectrum brand) about a teaspoon maybe
    Salt
    Water

    Add the amount of water to the flour as instructed on the package of masa, but use half masa and half white whole wheat flour plus a little shortening. Roll into little balls and coat in some salty flour, sprinkle salty flour on bottom of tortilla press and on top of ball of dough, press and cook in a pan on medium high about 2 minutes each side and store in a tortilla warmer until ready to eat. Don't let them get too brown or they'll be stiff - or keep cooking them until they turn into chips. Delish! Perfect for fish tacos.

    Thank you husband for catching some shark last weekend to turn into delicious fish tacos!

    Saturday, October 9, 2010

    Product Review

    Lovely CSN Stores has once again offered for me to review one of their products. With over 200 stores and tons of products, including affordable dog furniture,   cheap bedroom furniture, gardening supplies and more it's hard for me to pick something. I'm waffling between this cutey for my cutey: a puffy bed for her to leap upon and snuggle into:

    Wouldn't Pocket look so much cuter on this bed than this dog?

    Or something more functional like a gardening tool or new knife for the kitchen.

    What do you think i should choose? Have you been considering a purchase from CSN Stores that you'd like me to review?

    Friday, October 8, 2010

    Puppy Sick Day

    Miss Pocket is having some tummy issues today and i'm set to work most of the day at Schatzelein (corner of Annie and South First St.) and then on a big art project we'll be hanging on Sunday.
    So, no post today.

    But look how cute she is, wish her well and feel free to recommend any puppy tummyache cures.


    My sleepy couchmate

    Thursday, October 7, 2010

    Drying Peppers

    The curse of the cayenne is lifted! And just look at how pretty these fruits are.

    Drying Cayenne Peppers
    Drying Cayenne Peppers

    My last batch of dried cayenne was ruined by mold during the drying process, so i'll be drying about half in this fashion, and half in my dehydrator. You want the fruit not in direct sun, with plenty of ventilation, and away from humidity. I just tie a string with a needle at the end to something, in this case a window shade cloth thing and string up the peppers as i pick them. Cayennes will complete their turning red off the vine, so feel free to pick them when they show some sign of red - the more you pick the more the plant will set fruit. Once these are all dry i'll take them down and store them in a sealed jar - cracking some for chilly flakes in a separate jar. If you live in a dryer climate you can leave them strung around and take them down as needed - but i think that's how my last batch ended up molding. It is not dry here (despite what people from Houston or Hawaii may think).

    Most of the peppers i grow are fleshy and don't dry well, so to store them for later seasons i have to use freezer space or pickle/can them for the cupboard. I had a HUGE thai pepper plant that should have given me lots of dryable peppers - out of that whole plant i got TWO tiny little peppers suitable only for a miniature dollhouse. I'm also growing a tabasco plant that supposedly ripens to red then dries, but i'll be picking most of them in their earlier, yellow stage. I put spice in everything i cook and have been very sadly without my own grown dried peppers. I'm ready to be back in action!

    Drying Cayenne Peppers


    This post seen in Simple Lives Thursday.

    Wednesday, October 6, 2010

    Wholesome Wednesdays: Calendula

    This is my first year to plant Calendula, and they seem to be germinating happily. Calendula does not like heat and can tolerate cooler temps so it gets planted in the fall for my climate. I hope to get enough that i can harvest and dry some flowers to grind as coloring for my soaps and decorate my homestead with more pretty dried flowers.

    Calendula seeds

    I add a few drops of calendula oil to all my soaps. It's a pretty yellow color and has soothing properties that are good for the skin. I'm sure the amount i put in my soap recipes isn't near enough to have any super impact, but i like to try and put little bits of as many soothing things as i can in my creations. Calendula is anti-inflammatory, anti-microbial and it promotes the healing of wounds. Apply calendula oil to any burns or scrapes you may have and rub it into sore muscles. Mix it with some shea butter or olive oil to make a salve to use on chapped lips or any skin abrasion.

    The flowers can also be steeped into a tea which can be used as a mouthwash or throat gargle - great for soothing infections and sore throats. The tea can even be soothing to hemorrhoids.

    Calendula is also edible. You can add it to salads or scrambled eggs for a pretty saffron color. This year i planted a pot with pansies, nasturtiums, spinach and calendula for a pretty and edible mixture.

    Take some precautions when using calendula: Do not apply any fat-based ointments, including calendula salve, to wounds that are oozing or weeping; use watery preparations only, such as calendula tea, and allow the area to air dry completely between applications.

    Calendula seeds
    Pocket is a great little garden helper.

    What is your favorite use for calendula?

    Tuesday, October 5, 2010

    Tilapia and Pesto - Easy Weeknight Meal

    So, i forgot to take a picture of this. Here's a photo of what's left of the pesto i made:

    Pesto with Pistachios

    I know, wow, that's not a great photo. It was a great dinner though! Although, i must admit i made it too spicy for my very-chapped-from-mouth-breathing-with-allergies lips. Tonight's dinner will be bland.

    This dinner was easy to do and i did all the prep during commercial breaks of my still favorite show, House. The pesto was an experiment using the last of my Genovese basil and some shelled, raw pistacios. I simply blended the basil, pistacios - about a half cup to about 2 cups basil, salt and some olive oil. Wammo, and really interestingly tasty. I think i'll try more pestos with these flavorful and already green nuts - really adds another dimension to the pesto.

    Pesto with Pistachios
    Tilapia with Pesto:
    • 4 thawed tilapia filets
    • 8 ice cubes or about 1 cup chicken broth
    • 1/2 onion, diced
    • 1 large garlic clove, diced
    • about 5 oz pesto
    • 2 serranos, diced. 2 too many this time around. Ouch.
    Lay out fish, stock, onions, garlic and peppers in a saute pan, lidded. Season with salt and pepper and spoon pesto in on top. Heat at medium until cooked through, flipping half way. I chopped in one commercial, turned on heat in another, flipped in another and all was ready to eat in about 45 minutes - would have been 20-30 if i'd been cooking higher with more attention paid. Served with brown rice and a side of peas.
    Good, i tell ya. Real good and saucy. The rice absorbed the sauce and the peas swam around with whatever sauce was left and plates were licked clean!

    Monday, October 4, 2010

    Garden Critter Spotlight: Giant Swallowtail Butterfly - Orange Dog Caterpillar

    I love my lemon tree to pieces. Which means this lovely caterpillar is about the only one i allowed to live, picking off the rest of his brethren. The Orange Dog Caterpillar mimics bird poo to avoid being eaten by predators (as is proven by the hens' total disinterest in eating the picked off bugs we offered to them), and is a pretty good trick on human eyes, too! The caterpillars start out quite small and get larger, able to chow down pretty heavily on citrus leaves. On larger trees, they wouldn't be much of a problem and worth leaving alone to enjoy the beautiful Giant Swallotail Butterflies. But my little tree is just now leafing back out in the cooler days and i'm not about to let those new, tasty leaves be gobbled up by caterpillars, no matter how pretty their mature phase is. The more leaves on a lemon, the more fruits, and with the Grackle birds pecking at all my ripening lemons i need all the foliage i can get!

    That being said, i allowed this guy to stick around since he was already pretty large. I picked off several other from my little kaffir lime trees as they're SUPER small and one caterpillar can defoliate them in a jiffy - and did.

    Is that bird poo on my lemon tree? Nope, it's a caterpillar, and check out those horns when provoked!

    What's Growin' End of September 2010
    What's Growin' End of September 2010
    What's Growin' End of September 2010

    Part of gardening is managing 'pests' and all the critters in your landscape. Do you let them run amuck and manage themselves? Do you step in and remove certain, less ideal bugs? I try and leave most things alone. The anoles will eat the baby leaf footed bugs, but not quickly enough so i spray them down with soapy/spicy/garlicy water when i can find them.  The toads, geckos, skinks and other crawlies do a pretty good job of managing most the other bugs and the birds get the majority of the hornworms and other caterpillars. If i had more than one lemon tree, i'd let all these funny looking caterpillars have their way with the foliage and mature into beautiful butterflies.
    But i've only got my one lovely, and i'm not afraid to defend her!

    Friday, October 1, 2010

    Time to Plant Garlic in Austin

    The moon is waning*. It's the first of October. Nights are cooling and days are shortening.
    It's time to plant the garlic.

    harvested garlic

    I saved several bulbs from my summer harvest and plan on planting them on Sunday with some homemade bone meal. I'll put most in my back bed, along with the multiplying onions, but stick a few somewhere in the front as well since that bed is not looking promising, sunny, or consistently watered/tended by me.

    You have most of the month to plant, but as we may be moving in the early summer i want to get them in as soon as possible and hope for a chance at harvesting them before we go.

    Elephant Garlic
    Little elephant garlic peeking out last fall.

    *Moon phase gardening is something new to me, and i have no idea if it's valid or just hocus pocus. The idea is that you plant veggies that grow below ground (carrots, potatoes, radishes, garlic) when the moon is waning and plants that grow above (tomatoes, kale, most everything else) when the moon is waxing. It's not always easy to remember this or get the timing with the season and rainfall right. I have a handy dandy moon phase calendar on this blog that i refer to often. Check it out and try your hand at moon phase gardening. It's worth a shot!